Achieving natural posterior tooth anatomy in composite restorations is one of the most skill-dependent tasks in restorative dentistry. The challenge is not only to replicate cuspal morphology but also to ensure adequate curing depth without compromising material properties (Posterior Composite Anatomy Instruments).
If the restoration is over-contoured or poorly sculpted, it can lead to occlusal interference, weak contact points, and incomplete polymerization. This is why instrument selection plays a critical role in balancing anatomy reproduction and curing efficiency.
Why Posterior Anatomy is Difficult to Reproduce
Posterior teeth have complex morphology, including:
- Deep fissures and fossae
- Prominent cusps
- Functional occlusal slopes
- Tight interproximal contacts
Composite materials must be placed in layers and shaped precisely to mimic these features. However, bulk manipulation or improper instrumentation can trap air, distort anatomy, or block curing light penetration.
Key Challenge: Anatomy vs Curing Depth
One of the most critical conflicts in posterior composite placement is:
- Better anatomy shaping often reduces light penetration
- Better curing access may limit anatomical precision
This means clinicians must choose instruments that allow fine sculpting while maintaining space for adequate light transmission and depth of cure.
Ideal Instrument Characteristics for Posterior Anatomy
To effectively reproduce cuspal morphology, an ideal instrument should provide:
- Non-stick surface for smooth manipulation
- Fine tips for fissure detailing
- Controlled pressure application
- Minimal composite dragging
- Access to deep occlusal anatomy
These features ensure that cusps, ridges, and grooves are accurately formed without disturbing material integrity.
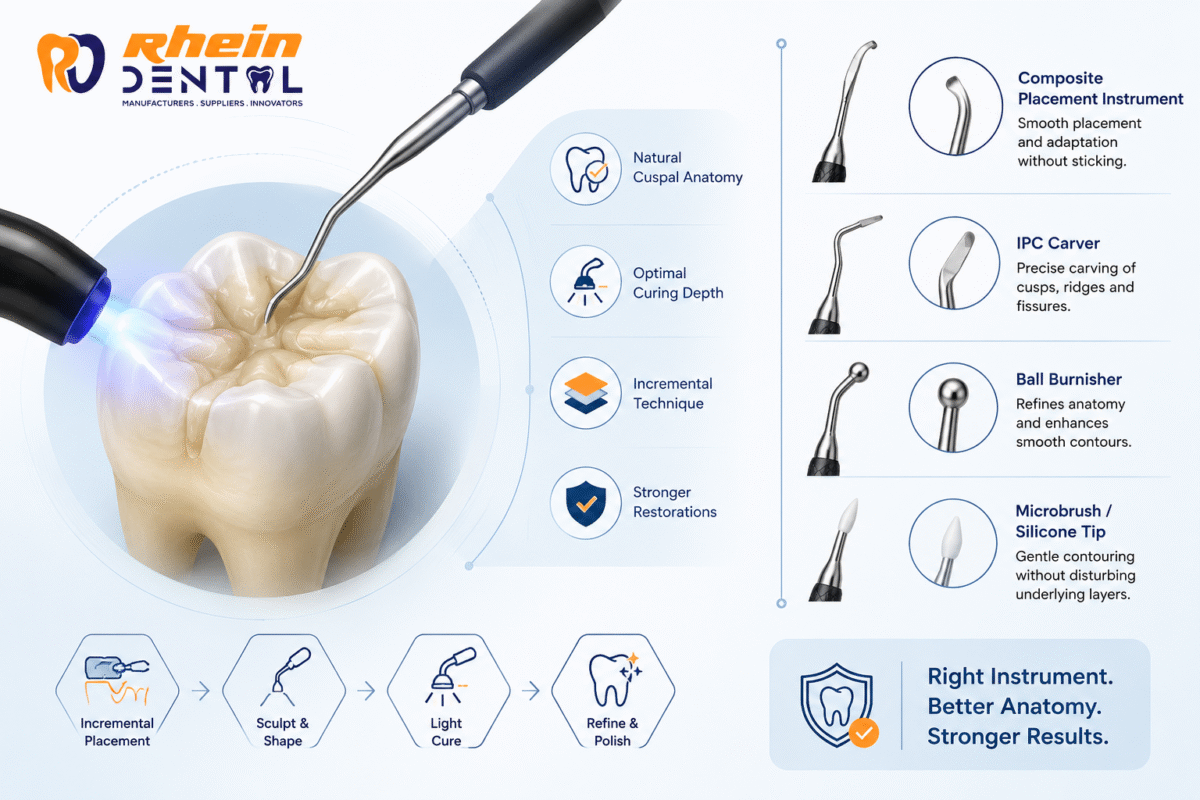
Best Instruments for Replicating Cuspal Morphology
1. Composite Placement Instruments (Teflon-Coated or Titanium Tips)
These are among the most widely used tools for posterior anatomy creation.
Why they work well:
- Prevent composite sticking during sculpting
- Allow precise cusp carving
- Maintain smooth surface adaptation
- Support incremental layering without distortion
Their non-reactive surface helps preserve anatomy while reducing pull-back of material.
2. IPC Carvers (Interproximal Carving Instruments)
IPC instruments are especially effective in shaping:
- Marginal ridges
- Proximal contours
- Occlusal embrasures
They allow controlled carving of fissures and cuspal slopes without compressing the material excessively.
3. Ball Burnishers
Ball burnishers are useful for refining anatomy after initial placement.
Advantages:
- Smooth cusp tips
- Improve marginal adaptation
- Reduce surface irregularities
- Enhance natural occlusal form
They are particularly helpful in polishing anatomical transitions between cusps and fossae.
4. Microbrush and Silicone Tips
These are often underestimated but highly effective for:
- Gentle contouring of uncured composite
- Creating smooth fissure lines
- Preventing over-compression of material
They allow anatomy refinement without disturbing underlying layers.
Preserving Curing Depth While Sculpting Anatomy
Proper curing depth is essential for long-term restoration stability. Excessive sculpting pressure or over-thick layering can compromise polymerization.
Key Clinical Strategies:
1. Incremental Layering Technique
Placing composite in controlled increments ensures:
- Better light penetration
- Reduced shrinkage stress
- Improved depth of cure
2. Strategic Instrument Angulation
Using instruments at shallow angles prevents shadowing of light-curing units.
3. Avoid Over-Sculpting Before Curing
Excessive shaping before initial light cure can:
- Reduce internal curing efficiency
- Create dense material zones
- Lead to incomplete polymerization
Instruments That May Compromise Curing Depth
Some instruments, if used improperly, may interfere with proper curing:
- Wide flat spatulas (can block light penetration)
- Over-compressive condensers (increase material density too early)
- Deep carving instruments before initial cure
The key is timing—anatomy should be refined progressively, not aggressively at once.
Balancing Anatomy and Depth: Clinical Approach
A predictable approach includes:
- Place initial composite increment
- Use non-stick placement instrument for basic contour
- Light cure partially
- Refine anatomy using IPC or burnisher
- Final curing with proper exposure time
- Final polishing for cuspal refinement
This stepwise method ensures both anatomical accuracy and complete polymerization.
Conclusion
Replicating posterior cuspal morphology in composite restorations requires more than artistic skill—it depends heavily on instrument selection and controlled technique.
Non-stick composite placement instruments, IPC carvers, and ball burnishers offer the best combination of precision and safety for anatomy shaping without compromising curing depth.
By combining incremental layering with careful instrument handling, clinicians can achieve restorations that are not only anatomically accurate but also structurally durable and fully polymerized.