
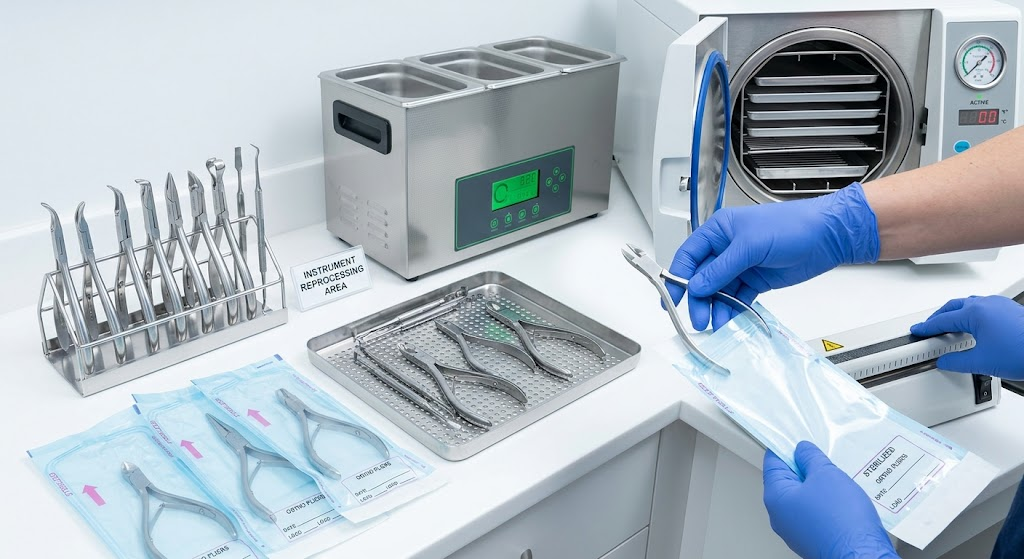
Orthodontic clinics rely on reusable instruments every day to provide safe, efficient, and precise patient care. However, the effectiveness of these instruments depends not only on their quality but also on how they are cleaned, disinfected, sterilized, inspected, and stored between patients.
Proper reprocessing orthodontic instruments is one of the most important infection prevention measures in modern dentistry. It reduces the risk of cross-contamination, extends instrument lifespan, supports regulatory compliance, and ensures consistent clinical performance.
This comprehensive guide explains the complete orthodontic instrument reprocessing workflow, international best practices, common mistakes to avoid, and practical tips for maintaining patient safety and compliance.
Why Proper Reprocessing Matters
Every orthodontic appointment exposes instruments to:
- Blood
- Saliva
- Oral bacteria
- Viruses
- Biofilm
- Dental materials
- Adhesives
- Composite residue
Without proper cleaning and sterilization, microorganisms may remain on instrument surfaces and potentially be transferred to another patient.
Proper reprocessing helps:
- Prevent cross-infection
- Protect patients and staff
- Meet regulatory requirements
- Preserve instrument functionality
- Reduce replacement costs
- Improve clinic efficiency
- Maintain professional reputation
What Is Reprocessing of Orthodontic Instruments?
Reprocessing is the complete procedure that prepares reusable orthodontic instruments for safe use on the next patient.
The process includes:
- Point-of-use treatment
- Safe transportation
- Cleaning
- Rinsing
- Inspection
- Functional testing
- Lubrication (if required)
- Packaging
- Sterilization
- Storage
- Documentation
Skipping any of these steps increases infection risks.
Common Orthodontic Instruments That Require Reprocessing
Many reusable orthodontic tools require validated cleaning and sterilization after every patient.
Examples include:
- Orthodontic pliers
- Band removing pliers
- Band pushers
- Ligature cutters
- Distal end cutters
- Wire cutters
- Mathieu needle holders
- Bracket positioning tweezers
- Bracket removing pliers
- Weingart pliers
- Bird beak pliers
- Utility pliers
- Three-prong pliers
- Mirror handles
- Explorers
- Tweezers
- Ligature directors
- Archwire forming instruments
Step 1: Point-of-Use Pre-Cleaning
Cleaning starts immediately after treatment.
Do not allow:
- Blood
- Saliva
- Composite
- Cement
- Bonding resin
to dry on instruments.
Best practices include:
- Remove gross debris immediately.
- Wipe instruments with damp gauze.
- Keep instruments moist using approved holding solutions.
- Never soak instruments in saline.
Dried organic material becomes much harder to remove.
Step 2: Safe Transportation
Transport contaminated instruments in:
- Closed containers
- Leak-proof trays
- Clearly labeled containers
This minimizes accidental exposure for staff.
Step 3: Thorough Cleaning
Cleaning is the most critical stage because sterilization cannot reliably penetrate heavy debris.
Cleaning removes:
- Organic material
- Blood
- Saliva
- Protein
- Composite residue
- Adhesive remnants
- Plaque
Methods include:
Manual Cleaning
Suitable for delicate instruments.
Requirements:
- Soft nylon brushes
- Neutral pH detergents
- Warm water
- Appropriate PPE
Avoid:
- Steel brushes
- Abrasive powders
- Household detergents
Ultrasonic Cleaning
Many orthodontic practices use ultrasonic cleaners because they:
- Reach difficult areas
- Remove debris efficiently
- Reduce manual handling
- Improve consistency
Ultrasonic cleaning is particularly useful for:
- Hinged instruments
- Serrated jaws
- Orthodontic pliers
- Cutters
Always follow manufacturer-recommended cleaning times.
Automated Washer-Disinfectors
Larger clinics often use washer-disinfectors because they provide:
- Standardized cleaning
- Thermal disinfection
- Reduced handling
- Better documentation
- Improved workflow
Automation also minimizes operator variability.
Step 4: Rinse and Dry Completely
After cleaning:
- Rinse thoroughly.
- Remove detergent residues.
- Dry completely.
Moisture can:
- Cause corrosion
- Promote staining
- Interfere with sterilization
- Damage packaging
Medical-grade compressed air helps dry hinged instruments effectively.
Step 5: Inspection
Every instrument should be inspected before sterilization.
Check for:
- Corrosion
- Rust
- Cracks
- Loose joints
- Bent tips
- Misalignment
- Damaged cutting edges
- Residual debris
Magnification improves inspection accuracy.
Damaged instruments should be repaired or replaced.
Step 6: Functional Testing
Orthodontic pliers should open and close smoothly.
Verify:
- Jaw alignment
- Spring tension
- Locking mechanisms
- Cutting efficiency
- Grip stability
Poorly functioning instruments compromise treatment quality.
Step 7: Lubrication (When Required)
Some hinged instruments require:
- Instrument milk
- Water-soluble lubricant
Lubrication:
- Prevents corrosion
- Improves movement
- Extends service life
Never use industrial oils.
Step 8: Packaging for Sterilization
Packaging protects instruments after sterilization.
Common packaging includes:
- Sterilization pouches
- Wrapped trays
- Sterilization cassettes
- Instrument containers
Packaging should include:
- Sterilization indicator
- Date
- Batch information
- Operator identification
Step 9: Sterilization
Steam sterilization remains the preferred method for most orthodontic instruments.
Benefits include:
- Reliable microbial destruction
- Fast processing
- Excellent material compatibility
- Proven effectiveness
Typical sterilization involves:
- Pre-vacuum autoclaves
- Gravity displacement systems
- Validated cycles
Always follow the instrument manufacturer’s recommendations.
Sterilization Monitoring
Monitoring should include:
Mechanical Monitoring
Review:
- Time
- Temperature
- Pressure
Chemical Indicators
Verify exposure to sterilization conditions.
Indicators should be used:
- Inside packs
- Outside packs
Biological Indicators
Biological monitoring provides the highest assurance of sterilization effectiveness.
Routine spore testing verifies that sterilization processes remain effective.
Step 10: Storage
Sterile instruments should be stored in:
- Clean cabinets
- Dry environments
- Dust-free areas
- Controlled storage rooms
Avoid:
- High humidity
- Direct sunlight
- Damaged packaging
- Overcrowded shelves
Compromised packaging requires reprocessing before use.
Documentation and Traceability
Modern dental practices maintain detailed sterilization records.
Documentation may include:
- Sterilization cycle number
- Date
- Operator
- Load contents
- Biological monitoring results
- Maintenance records
Traceability simplifies quality assurance and audits.
Infection Control Standards
Orthodontic clinics should follow nationally applicable infection prevention guidance and manufacturer instructions.
Core principles generally include:
- Standard precautions for every patient
- Proper PPE
- Hand hygiene
- Instrument classification
- Validated sterilization procedures
- Routine equipment maintenance
- Staff competency and training
- Quality assurance documentation
Clinics should always follow the regulations and guidance issued by their local health authorities and professional organizations.
Common Reprocessing Mistakes
Avoid these common errors:
- Delaying cleaning
- Overloading ultrasonic cleaners
- Mixing incompatible metals
- Skipping inspection
- Using damaged pouches
- Incorrect autoclave loading
- Inadequate drying
- Using expired sterilization indicators
- Poor documentation
- Ignoring manufacturer instructions
Small mistakes can reduce sterilization effectiveness.
Extending Instrument Lifespan
Proper maintenance protects your investment.
Tips include:
- Use distilled water where recommended.
- Clean immediately after use.
- Avoid harsh chemicals.
- Lubricate hinged instruments.
- Inspect routinely.
- Replace worn cutters promptly.
- Store correctly.
- Avoid instrument misuse.
High-quality orthodontic instruments often provide years of reliable service when properly maintained.
Staff Training
Every clinical team member should understand:
- Infection prevention
- Cleaning procedures
- Sterilization protocols
- Instrument inspection
- Equipment maintenance
- Documentation requirements
- Emergency exposure procedures
Regular competency assessments improve consistency.
Benefits of Proper Reprocessing
Effective reprocessing offers significant advantages:
- Improved patient safety
- Reduced infection risk
- Regulatory compliance
- Longer instrument lifespan
- Lower replacement costs
- Better clinical efficiency
- Increased patient confidence
- Consistent treatment quality
- Enhanced clinic reputation
Conclusion
Reprocessing orthodontic instruments is far more than a cleaning routine—it is a critical component of patient safety, infection prevention, and clinical excellence. Every stage, from chairside pre-cleaning and ultrasonic washing to inspection, sterilization, and secure storage, contributes to delivering safe and effective orthodontic care.
By implementing standardized reprocessing protocols, investing in staff training, maintaining accurate documentation, and following manufacturer instructions and local regulatory guidance, orthodontic clinics can reduce the risk of cross-contamination, improve operational efficiency, and protect the performance and lifespan of their instruments. A consistent, validated reprocessing workflow not only supports compliance but also reinforces patient confidence and the long-term success of the practice.
Frequently Asked Questions:
Reusable orthodontic instruments should be cleaned and sterilized after every patient according to the manufacturer’s instructions and your clinic’s infection control protocols.
No. Instruments that contact mucous membranes or become contaminated during treatment generally require sterilization rather than disinfection alone.
No. Ultrasonic cleaning removes debris but does not replace sterilization. Instruments must still undergo a validated sterilization cycle.
Inspection identifies damage, corrosion, misalignment, or remaining debris that could compromise patient safety or instrument performance.
Immediate cleaning, proper lubrication when required, routine inspection, validated sterilization, and correct storage all help maximize instrument longevity.