
Orthodontic instruments are essential for delivering safe, precise, and efficient patient care. From placing brackets and adjusting archwires to removing orthodontic appliances, every procedure depends on reliable instruments that perform consistently. However, even premium-quality orthodontic tools gradually wear out after repeated use and sterilization(Damaged orthodontic tools).
Ignoring damaged instruments can create serious clinical challenges. For example, worn cutting edges may reduce precision, while loose joints can compromise control during delicate procedures. As a result, clinicians may experience longer treatment times, reduced efficiency, and an increased risk of patient injury.
Therefore, every orthodontic practice should establish a structured system for identifying, handling, repairing, and disposing of damaged orthodontic tools. Besides protecting patients, proper instrument management helps maintain infection control standards, improves workflow, and reduces unnecessary replacement costs(Damaged orthodontic tools).
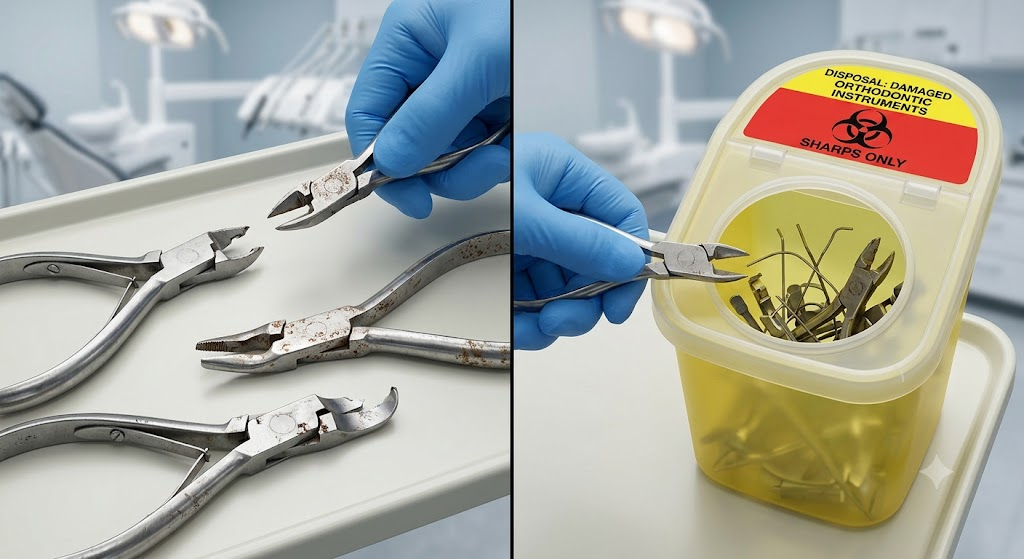
In this comprehensive guide, you’ll learn how to recognize damaged orthodontic instruments, understand the causes of instrument failure, implement safe handling procedures, and dispose of worn tools responsibly while complying with modern dental practice standards.
Why Proper Handling of Damaged Orthodontic Instruments Matters
Orthodontic instruments are designed to withstand repeated clinical use and sterilization. Nevertheless, no reusable instrument is immune to wear and tear. Daily exposure to moisture, chemicals, mechanical pressure, and high autoclave temperatures gradually affects the performance of stainless steel instruments(Damaged orthodontic tools).
Consequently, using damaged orthodontic tools may lead to several problems, including:
- Reduced treatment accuracy
- Unexpected instrument breakage
- Increased chair time
- Patient discomfort
- Soft tissue injuries
- Higher infection risks
- Costly emergency replacements
Beyond clinical concerns, damaged instruments can negatively affect patient confidence. Moreover, unreliable tools may interrupt procedures and increase stress for both clinicians and dental assistants.
Ultimately, removing damaged instruments before they fail is one of the simplest ways to improve patient safety and maintain a high standard of orthodontic care.
Common Causes of Orthodontic Instrument Damage
Understanding why orthodontic instruments become damaged allows clinics to implement preventive maintenance strategies and extend instrument lifespan.
1. Repeated Sterilization Cycles
During every sterilization cycle, orthodontic instruments are exposed to extreme heat, steam pressure, moisture, and cleaning agents. Over time, these repeated conditions gradually affect the metal surface.
Common effects include:
- Surface dullness
- Metal fatigue
- Joint wear
- Reduced cutting efficiency
- Early corrosion
Although stainless steel is highly durable, continuous sterilization eventually contributes to normal instrument aging.
2. Mechanical Stress During Daily Procedures
Every orthodontic appointment places mechanical stress on working instruments. Distal end cutters, hard wire cutters, ligature cutters, and orthodontic pliers experience significant pressure whenever wires are bent or cut.
As a result, repeated force may gradually cause:
- Jaw misalignment
- Loose hinges
- Reduced grip strength
- Cutting edge wear
Eventually, these problems reduce both efficiency and precision during treatment.
3. Improper Cleaning Techniques
Incorrect cleaning procedures are another major cause of instrument damage. Instead of protecting orthodontic tools, improper maintenance often accelerates deterioration.
Examples include:
- Using abrasive brushes
- Applying harsh chemicals
- Choosing unsuitable ultrasonic cleaning solutions
- Leaving detergent residue
- Failing to rinse thoroughly
Furthermore, aggressive cleaning products may damage the protective chromium oxide layer that helps stainless steel resist corrosion.
4. Accidental Drops and Physical Impact
Even high-quality orthodontic instruments can become damaged after falling onto hard surfaces.
For instance, accidental impacts may produce:
- Bent instrument tips
- Cracked handles
- Loose box joints
- Misaligned jaws
Although some damage appears minor, hidden structural changes may reduce instrument performance during future procedures.
5. Corrosion and Chemical Exposure
Corrosion remains one of the leading reasons reusable orthodontic instruments require replacement.
Several factors contribute to corrosion, including:
- Chloride-containing chemicals
- Saline contamination
- Poor drying techniques
- Mineral-rich water
- Chemical residue after cleaning
Eventually, corrosion weakens the metal surface and increases the likelihood of instrument failure during treatment.
How to Identify Damaged Orthodontic Instruments
Routine inspections help clinicians recognize damage before instruments compromise patient safety. Rather than waiting for an instrument to fail, dental teams should examine every tool during cleaning, sterilization, and preparation.
One of the First Warning Signs Is Rust
Rust usually indicates that the protective surface has deteriorated. In addition, corrosion can spread quickly if the instrument continues to be used.
Another Important Indicator Is Bent Instrument Tips
Bent tips reduce clinical accuracy and make orthodontic adjustments more difficult.
You Should Also Check for Loose Box Joints
Loose hinges decrease stability, reduce gripping power, and affect clinician control.
Cutting Performance Should Remain Sharp
Instead of producing clean cuts, dull orthodontic cutters often:
- Crush wires
- Slip unexpectedly
- Require excessive hand pressure
Small Cracks Should Never Be Ignored
Even tiny fractures may expand after repeated clinical use or sterilization.
Surface Pitting Requires Immediate Attention
Tiny holes in the metal frequently indicate corrosion beneath the protective surface.
Discoloration May Reveal Hidden Problems
Brown, blue, or rainbow-colored stains often suggest:
- Heat damage
- Chemical contamination
- Sterilization issues
Therefore, any instrument showing these signs should be removed from service until it has been inspected.
Orthodontic Instruments That Require Frequent Inspection
Although every reusable instrument deserves regular examination, some experience considerably greater mechanical stress than others. Consequently, these tools should receive additional attention during routine maintenance.
High-risk instruments include:
- Distal End Cutters
- Hard Wire Cutters
- Ligature Cutters
- Band Removing Pliers
- Bracket Removing Pliers
- Bird Beak Pliers
- Weingart Pliers
- Utility Pliers
- Mathieu Needle Holders
- Band Pushers
Inspecting these instruments more frequently helps reduce unexpected failures and improves treatment efficiency.
Risks of Using Damaged Orthodontic Tools
Continuing to use worn orthodontic instruments exposes both clinicians and patients to unnecessary risks. Moreover, even minor damage can affect treatment quality.
Increased Risk of Patient Injury
Loose or damaged instruments may:
- Slip unexpectedly
- Scratch enamel
- Damage gingival tissue
- Break inside the patient’s mouth
Consequently, patient safety may be compromised.
Reduced Clinical Precision
Accurate orthodontic treatment depends on properly functioning instruments.
Instead, damaged pliers or cutters may produce inaccurate bends, inconsistent cuts, and poor appliance adjustments.
Longer Clinical Appointments
When instruments perform poorly, clinicians spend more time completing routine procedures.
Additionally, prolonged appointments increase operator fatigue and reduce overall practice productivity.
Infection Control Concerns
Damaged surfaces frequently trap:
- Blood
- Saliva
- Organic debris
- Biofilm
Because of this, cleaning and sterilization become less effective, increasing the possibility of cross-contamination.
Daily Inspection Checklist for Orthodontic Instruments
Developing a simple inspection routine helps identify problems before every procedure.
Before using any orthodontic instrument, confirm the following:
✔ The instrument is clean.
✔ Jaw alignment is correct.
✔ Cutting edges remain sharp.
✔ Hinges move smoothly.
✔ No rust is visible.
✔ No cracks are present.
✔ Corrosion is absent.
✔ Handles remain secure.
Although this inspection requires less than one minute, it can prevent costly complications and significantly improve patient safety.
Safe Handling of Damaged Orthodontic Instruments
Once an orthodontic instrument shows signs of damage, immediate action is essential. Rather than returning it to the sterilization tray, follow a structured handling process.
Step 1: Immediately Remove the Instrument from Clinical Use
As soon as damage is identified, take the instrument out of service.
Under no circumstances should you continue using a compromised instrument during patient treatment.
Step 2: Clearly Label the Instrument
Next, attach a visible label such as:
- Damaged
- Repair
- Disposal
Doing so prevents accidental reuse by other members of the dental team.
Step 3: Store the Instrument Separately
Afterward, place the damaged instrument in a dedicated container away from sterile inventory.
Maintaining separate storage reduces confusion and supports infection control procedures.
Step 4: Determine Whether Professional Repair Is Appropriate
Fortunately, certain premium orthodontic instruments can be professionally refurbished.
Repair services may include:
- Cutting edge sharpening
- Jaw realignment
- Hinge adjustment
- Box joint tightening
However, instruments with structural cracks, severe corrosion, or permanent deformation should always be replaced instead of repaired.
Proper Disposal of Damaged Orthodontic Instruments
Responsible disposal protects patients, clinicians, and the environment while helping practices comply with healthcare regulations.
Decontaminate Instruments Before Disposal
Whenever local regulations require, clean and sterilize damaged instruments before disposal.
Use Approved Sharps Containers
Instead, place sharp orthodontic instruments into approved sharps containers to reduce the risk of accidental injuries.
Recycle Stainless Steel Whenever Possible
If local regulations permit, recycle stainless steel orthodontic instruments through approved medical recycling programs.
Maintain Accurate Disposal Records
Finally, record the following information:
- Instrument type
- Date removed from service
- Disposal method
- Replacement details
In addition, maintaining accurate documentation supports quality assurance programs, inventory management, and regulatory compliance.
Can Damaged Orthodontic Instruments Be Repaired?
Not every damaged orthodontic instrument needs immediate replacement. In many cases, professional refurbishment can restore functionality and extend the instrument’s service life. However, repair should only be considered when the structural integrity of the instrument remains intact.
Qualified repair specialists commonly perform the following services:
- Sharpening cutting edges
- Tightening box joints
- Realigning jaws
- Adjusting hinges
- Polishing surfaces
- Replacing tungsten carbide inserts (where applicable)
Even so, some types of damage cannot be repaired safely. Instruments with deep corrosion, fractured handles, cracked joints, or severe deformation should always be removed from service permanently.
Before approving a repair, compare the refurbishment cost with the price of purchasing a new instrument. If repair compromises performance or patient safety, replacement is the more appropriate solution.
Best Practices for Preventing Orthodontic Instrument Damage
Preventive maintenance is one of the most effective ways to maximize the lifespan of orthodontic instruments. By following consistent care procedures, clinics can reduce repair costs, improve treatment efficiency, and maintain reliable instrument performance.
Clean Instruments Using Approved Methods
Always use cleaning products designed specifically for surgical and dental instruments.
Recommended cleaning practices include:
- Neutral pH detergents
- Approved ultrasonic cleaning solutions
- Soft nylon cleaning brushes
- Thorough rinsing with clean water
On the other hand, abrasive materials and chlorine-based chemicals should be avoided because they may damage the protective stainless steel surface.
Lubricate Hinges and Moving Parts
Moving components experience continuous friction during clinical procedures.
Therefore, apply instrument lubricant whenever recommended by the manufacturer. Proper lubrication helps maintain smooth movement while reducing unnecessary wear on hinges and box joints.
Dry Instruments Completely After Cleaning
Moisture left on stainless steel instruments encourages corrosion.
For this reason, dry every instrument carefully before packaging or sterilization. Complete drying also helps preserve the protective oxide layer that resists rust formation.
Store Instruments Correctly
Proper storage is just as important as proper cleaning.
To reduce accidental damage, use:
- Sterilization cassettes
- Silicone instrument holders
- Protective storage trays
- Dedicated storage compartments
Likewise, avoid placing loose instruments together because repeated contact can scratch surfaces, dull cutting edges, or bend delicate tips.
Train the Entire Dental Team
Every member of the clinical team should understand how to care for orthodontic instruments correctly.
Training should include:
- Daily inspection procedures
- Cleaning protocols
- Sterilization guidelines
- Safe handling techniques
- Damage reporting procedures
- Storage recommendations
As a result, consistent staff education reduces preventable damage while promoting a safer clinical environment.
Creating an Instrument Lifecycle Management Program
Rather than replacing instruments only after failure occurs, successful orthodontic practices implement structured lifecycle management programs.
An effective program typically includes:
- Scheduled instrument inspections
- Preventive maintenance plans
- Repair documentation
- Replacement schedules
- Sterilization monitoring
- Inventory tracking
- Staff accountability
In addition, digital inventory systems make it easier to monitor instrument age, maintenance history, and replacement timelines.
Routine documentation also supports regulatory compliance and simplifies quality assurance audits.
When Should You Replace an Orthodontic Instrument?
Although some damage can be repaired, replacement becomes essential under certain circumstances.
Replace orthodontic instruments when:
- Rust continues to spread after cleaning.
- Structural cracks become visible.
- Cutting edges can no longer be sharpened.
- Jaw alignment cannot be restored.
- Hinges remain loose following repair.
- Corrosion affects instrument strength.
- Instrument performance no longer meets clinical standards.
Rather than delaying replacement, remove compromised instruments immediately to protect both clinicians and patients.
Choosing High-Quality Orthodontic Instruments
Selecting premium orthodontic instruments reduces maintenance requirements and improves long-term clinical performance.
When evaluating new instruments, consider features such as:
- Medical-grade stainless steel
- Excellent corrosion resistance
- Precision-machined working tips
- Comfortable ergonomic handles
- High-quality hinge construction
- Superior cutting performance
- Compliance with international manufacturing standards
Furthermore, purchasing instruments from reputable manufacturers provides greater confidence in durability, consistency, and product quality.
Although premium instruments may require a higher initial investment, they often deliver lower ownership costs throughout their lifespan.
Benefits of Replacing Damaged Orthodontic Tools Promptly
Replacing damaged instruments before they fail offers several important advantages.
These benefits include:
- Improved patient safety
- Better treatment precision
- Greater clinician confidence
- Reduced chair time
- Lower repair costs
- Enhanced infection control
- Longer-lasting instrument inventory
- Improved regulatory compliance
Ultimately, proactive replacement supports better clinical outcomes while minimizing unexpected interruptions during patient care.
Conclusion
Proper handling and disposal of damaged orthodontic tools is essential for maintaining patient safety, clinical accuracy, and infection control. Throughout every stage of an instrument’s lifecycle from routine inspection and preventive maintenance to professional repair and responsible disposal careful management helps reduce unnecessary risks and improve operational efficiency.
Moreover, identifying damage at an early stage allows orthodontic practices to avoid unexpected instrument failures, minimize treatment delays, and extend the lifespan of valuable equipment. A structured maintenance program also supports regulatory compliance while reducing long-term replacement costs.
By investing in high-quality orthodontic instruments, following manufacturer-recommended care procedures, and replacing compromised tools promptly, dental professionals can maintain consistently high standards of patient care. In the long run, these best practices contribute to improved clinical outcomes, greater workflow efficiency, and a safer environment for both patients and healthcare teams.
Frequently Asked Questions:
Ideally, inspect every orthodontic instrument after cleaning, before sterilization, and again before each clinical procedure. Regular inspections help identify wear before it affects patient care.
No. Rust indicates deterioration of the protective surface. Therefore, rusty instruments should be removed from service immediately and evaluated for professional repair or replacement.
Yes. Dull cutting edges require greater force during use. Consequently, clinicians face a higher risk of slipping, inaccurate wire cutting, and accidental soft tissue injury.
Minor problems such as hinge adjustments or sharpening may be repaired economically. However, structural damage, extensive corrosion, and cracked instruments generally require replacement.
To maximize longevity, practices should clean instruments correctly, lubricate moving parts, inspect them regularly, dry them thoroughly, store them safely, and provide continuous staff training.
Distal end cutters, hard wire cutters, ligature cutters, bracket removing pliers, and band removing pliers typically experience the greatest mechanical stress because they are used frequently during orthodontic treatment.