Step-by-Step Guide to Root Canal Instrumentation – Root Canal Instruments
Root canal instrumentation is one of the most common and essential dental procedures performed to save a tooth that has been severely decayed or infected. A crucial part of this procedure is root canal instrumentation, which involves cleaning and shaping the root canal system using specialized tools. In this guide, we’ll take you through a step-by-step explanation of root canal instrumentation, explore the types of instruments used, and highlight how each step contributes to the success of endodontic treatment.
What Is Root Canal Instrumentation?
Root canal instrumentation is the process of mechanically cleaning and shaping the root canal system after the infected pulp tissue has been removed. The goal is to:
- Eliminate bacteria and necrotic debris
- Create a smooth, tapered canal shape for effective irrigation and obturation
- Maintain the natural anatomy of the tooth
Proper instrumentation ensures a successful seal during filling and long-term stability of the treated tooth.
Step-by-Step Guide to Root Canal Instrumentation
Step 1: Access Cavity Preparation
The process begins with creating an access cavity in the tooth’s crown. This opening allows direct entry into the pulp chamber and canal system.
Instruments used:
- High-speed burs (round or tapered fissure burs)
- Endo access burs
Purpose:
To provide a straight-line path to the canal openings for better visibility and instrument control.
Step 2: Canal Exploration and Negotiation
Once access is achieved, the dentist locates and explores the root canals using endodontic explorers and small hand files.
Instruments used:
- DG-16 endodontic explorer
- Hand K-files (sizes 6, 8, 10)
Purpose:
To identify the canal orifices and ensure the canals are patent (open) before proceeding.
Step 3: Working Length Determination
Accurate working length (distance from the reference point on the crown to the apex of the root canal) is critical for complete cleaning and avoiding over-instrumentation.
Instruments used:
- Apex locator
- Endodontic ruler
- Radiographs
Purpose:
To establish the precise canal length for cleaning and shaping.
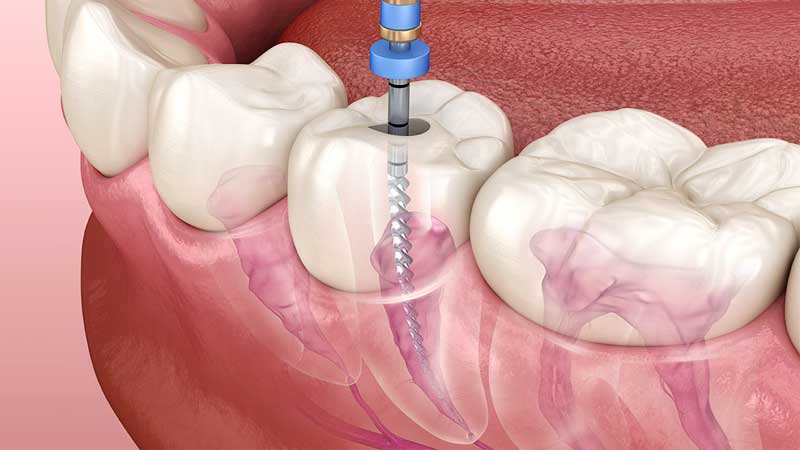
Step 4: Cleaning and Shaping the Canal
This is the most critical phase of instrumentation. It involves removing infected pulp tissue and shaping the canal into a tapered form to facilitate irrigation and obturation.
Instruments used:
- Hand files (K-files, H-files, reamers)
- Rotary NiTi files (ProTaper, WaveOne, etc.)
- Irrigation needles and syringes
Purpose:
To mechanically and chemically disinfect the canal system while maintaining its natural curvature.
Technique:
Dentists often use a crown-down or step-back technique, depending on canal anatomy and instrument type.
Step 5: Irrigation and Cleaning
During and after instrumentation, the canals are irrigated to flush out debris and kill residual bacteria.
Common irrigants:
- Sodium hypochlorite (NaOCl)
- EDTA (for smear layer removal)
- Chlorhexidine
Instruments used:
- Side-vented irrigation needles
- EndoVac irrigation system
Purpose:
To ensure complete disinfection and removal of debris from the canal walls.
Step 6: Drying the Canal
Before filling, the canal must be thoroughly dried.
Instruments used:
- Paper points
Purpose:
To remove moisture and prepare the canal for obturation (filling).
Step 7: Obturation (Filling the Canal)
Although obturation is technically beyond instrumentation, it is the final stage after cleaning and shaping. It involves sealing the canal to prevent reinfection.
Instruments used:
- Gutta-percha cones
- Endodontic spreaders and pluggers
- Root canal sealer
Purpose:
To fill the canal completely and ensure a hermetic seal.
Types of Root Canal Instruments
Root canal instruments can be broadly classified into:
| Category | Examples | Purpose |
|---|---|---|
| Exploring & Accessing | DG-16 explorer, burs | Canal location |
| Measuring | Apex locator, ruler | Working length |
| Cleaning & Shaping | Hand files, rotary files | Canal preparation |
| Irrigating & Drying | Needles, paper points | Canal disinfection |
| Filling (Obturation) | Gutta-percha, pluggers | Canal sealing |
Tips for Effective Root Canal Instrumentation
- Use glide path preparation before rotary instruments.
- Maintain irrigation throughout to prevent debris accumulation.
- Replace worn-out files regularly to avoid breakage.
- Always verify working length with both apex locator and radiograph.
- Avoid excessive force to prevent canal transportation or perforation.
Conclusion
Successful root canal therapy relies heavily on precise and efficient instrumentation. By following a structured step-by-step approach and using the right root canal instruments, dentists can ensure thorough cleaning, proper shaping, and long-lasting treatment success.
Modern advancements like rotary NiTi systems and electronic apex locators have made root canal instrumentation faster, safer, and more predictable — ensuring better outcomes and greater patient comfort.